
ラズパイに Ubuntu 20.04 LTS (Focal Fossa) をインストール
今年の5月頃、ラズパイ3B上に、Ubuntu 20.04 LTS をインストールしたときのメモです。
確か、WireGuardを試してみたくて、AWSをサーバにして、ラズパイをクライアントにして実験君をしました。
WireGuard自体は仮想環境だからなのか、うまく動かなかったが、ラズパイ上のUbuntu Server自体は正常に動きました。
その後、ラズパイ上のUbuntu ServerでNextCloudを動かしたりしましたが、特に問題なく運用できました。
では行ってみましょう!!
Ubuntu 20.04 LTS (Focal Fossa) インストール
ダウンロードサイト:http://cdimage.ubuntu.com/releases/20.04/release/
 |
ダウンロードしたインストール媒体をツールは何でも構いませんが、balenaEtcherでMicroSDに焼きました。そして立ち上げると・・・
- 初期ログイン
「Started WPA supplicant.」「Start Daily apt upgrade and clean activities」と表示されたら、[ENTER]を入力
ubuntu login: と表示されたら、ユーザ「ubuntu」、パスワード「ubuntu」でログインします。
初めに、パスワードの変更をする手順になっているので、「Current password:」で、現在のパスワード「ubuintu」を入れてから
新しいパスワードを2回入れて、変更します。
この段階で、IPアドレスが割り当てられて、画面に表示されているので、SSHを使って、ログインできます。
- Wifi を生かすためには、
OSイメージをコピーしたMicroSDを一度、差し込み直して、「system-boot」ボリュームの「network-config」の「wifis:」以降を7行コメントをはずして、SSIDとパスワードを設定する
# This file contains a netplan-compatible configuration which cloud-init
# will apply on first-boot. Please refer to the cloud-init documentation and
# the netplan reference for full details:
#
# https://cloudinit.readthedocs.io/
# https://netplan.io/reference
#
# Some additional examples are commented out below
version: 2
ethernets:
eth0:
dhcp4: true
optional: true
wifis:
wlan0:
dhcp4: true
optional: true
access-points:
myhomewifi:
password: “Password“
# myworkwifi:
# password: “correct battery horse staple”
# workssid:
# auth:
# key-management: eap
# method: peap
# identity: “me@example.com”
# password: “passw0rd”
# ca-certificate: /etc/my_ca.pem
- パッケージの更新とOS最新化
ubuntu@ubuntu:~$ sudo apt update
ubuntu@ubuntu:~$ sudo apt -y upgrade
- ロケールとキーボードとリポジトリの設定
ubuntu@ubuntu:~$ sudo locale-gen ja_JP.UTF-8
Generating locales (this might take a while)…
ja_JP.UTF-8… done
Generation complete.
ubuntu@ubuntu:~$ sudo dpkg-reconfigure -f noninteractive locales
Generating locales (this might take a while)…
en_US.UTF-8… done
ja_JP.UTF-8… done
Generation complete.
ubuntu@ubuntu:~$ echo “LANG=ja_JP.UTF-8” | sudo tee /etc/default/locale
LANG=ja_JP.UTF-8
ubuntu@ubuntu:~$ sudo timedatectl set-timezone Asia/Tokyo
キーボードレイアウトの変更は,/etc/default/keyboardを開いて XKBLAYOUT=”us” を XKBLAYOUT=”jp” に変更する
そのために、まずルート権限を取得して、ルートユーザのパスワードを設定する
ubuntu@ubuntu:~$ sudo -s
root@ubuntu:/home/ubuntu# sudo passwd root
New password: ←ルートユーザのパスワードを設定
Retype new password: ←ルートユーザのパスワードを再度、設定
passwd: password updated successfully
権限を所得したので、書き換える
root@ubuntu:/home/ubuntu# vi /etc/default/keyboard
# KEYBOARD CONFIGURATION FILE
# Consult the keyboard(5) manual page.
XKBMODEL=”pc105″
XKBLAYOUT=”jp” ←「jp」に変更
XKBVARIANT=””
XKBOPTIONS=””
BACKSPACE=”guess”
次のコマンドで設定を反映する
root@ubuntu:/home/ubuntu# sudo dpkg-reconfigure -f noninteractive keyboard-configuration
Your console font configuration will be updated the next time your system
boots. If you want to update it now, run ‘setupcon’ from a virtual console.
update-initramfs: deferring update (trigger activated)
Processing triggers for initramfs-tools (0.136ubuntu6) …
update-initramfs: Generating /boot/initrd.img-5.4.0-1008-raspi
Using DTB: bcm2710-rpi-3-b-plus.dtb
Installing /lib/firmware/5.4.0-1008-raspi/device-tree/broadcom/bcm2710-rpi-3-b-plus.dtb into /boot/dtbs/5.4.0-1008-raspi/./bcm2710-rpi-3-b-plus.dtb
Installing new bcm2710-rpi-3-b-plus.dtb.
Installing /lib/firmware/5.4.0-1008-raspi/device-tree/broadcom/bcm2710-rpi-3-b-plus.dtb into /boot/dtbs/5.4.0-1008-raspi/./bcm2710-rpi-3-b-plus.dtb
Taking backup of bcm2710-rpi-3-b-plus.dtb.
Installing new bcm2710-rpi-3-b-plus.dtb.
: : : :
: : : :
: : : :
Taking backup of hifiberry-dac.dtbo.
Installing new hifiberry-dac.dtbo.
Taking backup of spi2-1cs.dtbo.
Installing new spi2-1cs.dtbo.
Taking backup of w5500.dtbo.
Installing new w5500.dtbo.
- ラズパイを再起動
root@ubuntu:/home/ubuntu# reboot
- ホスト名の変更
ubuntu@ubuntu:~$ sudo hostnamectl set-hostname rpi-ubntsvr
ubuntu@ubuntu:~$ hostnamectl | grep hostname
Static hostname: rpi-ubntsvr
- 設定反映のため、ラズパイを再起動
ubuntu@ubuntu:~$ sudo reboot
- mDNSの導入
ubuntu@rpi-ubntsvr:~$ sudo apt -y install avahi-daemon avahi-utils libnss-mdns
パッケージリストを読み込んでいます… 完了
依存関係ツリーを作成しています
状態情報を読み取っています… 完了
以下の追加パッケージがインストールされます:
libavahi-client3 libavahi-common-data libavahi-common3 libavahi-core7
libdaemon0
提案パッケージ:
avahi-autoipd avahi-autoipd | zeroconf
以下のパッケージが新たにインストールされます:
avahi-daemon avahi-utils libavahi-client3 libavahi-common-data
libavahi-common3 libavahi-core7 libdaemon0 libnss-mdns
アップグレード: 0 個、新規インストール: 8 個、削除: 0 個、保留: 0 個。
257 kB のアーカイブを取得する必要があります。
この操作後に追加で 1,223 kB のディスク容量が消費されます。
取得:1 http://ports.ubuntu.com/ubuntu-ports focal/main arm64 libavahi-common-data arm64 0.7-4ubuntu7 [21.3 kB]
取得:2 http://ports.ubuntu.com/ubuntu-ports focal/main arm64 libavahi-common3 arm64 0.7-4ubuntu7 [20.4 kB]
取得:3 http://ports.ubuntu.com/ubuntu-ports focal/main arm64 libavahi-core7 arm64 0.7-4ubuntu7 [73.4 kB]
: : : :
: : : :
: : : :
First installation detected…
Checking NSS setup…
avahi-utils (0.7-4ubuntu7) を設定しています …
man-db (2.9.1-1) のトリガを処理しています …
dbus (1.12.16-2ubuntu2) のトリガを処理しています …
libc-bin (2.31-0ubuntu9) のトリガを処理しています …
systemd (245.4-4ubuntu3) のトリガを処理しています …
ubuntu@rpi-ubntsvr:~$ sudo sed -i ‘s/mdns4/mdns/’ /etc/nsswitch.conf
ubuntu@rpi-ubntsvr:~$ sudo systemctl is-enabled avahi-daemon
enabled
ubuntu@rpi-ubntsvr:~$ avahi-resolve -n rpi-ubntsvr.local ←IPv6名前解決OK
rpi-ubntsvr.local 2408:212:5c3:2200:6ab:18ff:fe25:aa91
ubuntu@rpi-ubntsvr:~$ avahi-resolve -4 -n rpi-ubntsvr.local ←IPv4名前解決OK
rpi-ubntsvr.local 172.28.94.68
- cloud-init を使って、固定IPアドレスを設定する。(固定IPアドレスが必要な時)
ubuntu@rpi-ubntsvr:~$ vi /etc/netplan/50-cloud-init.yaml
# This file is generated from information provided by the datasource. Changes
# to it will not persist across an instance reboot. To disable cloud-init’s
# network configuration capabilities, write a file
# /etc/cloud/cloud.cfg.d/99-disable-network-config.cfg with the following:
# network: {config: disabled}
network:
ethernets:
ens0:
dhcp4: true
version: 2
ubuntu@rpi-ubntsvr:~$ vi /etc/netplan/50-cloud-init.yaml
network: →50-cloud-init.yaml は内容そのままにしておく
version: 2
renderer: networkd
ethernets:
eth0:
dhcp4: false
dhcp6: false
addresses: [192.168.0.177/24]
gateway4: 192.168.0.1 →99_config.yaml で固定IPアドレスの内容をセットする
nameservers:
addresses: [203.165.31.152,122.197.254.36]
wifis:
wlan0:
addresses: []
dhcp4: true
optional: true
access-points:
ACCESSPOINT-SSID1:
password: “Password1”
ACCESSPOINT-SSID2:
password: “Password1”
ubuntu@rpi-ubntsvr:~$ sudo netpaln apply →設定を反映
- スワップファイルの作成
ubuntu@rpi-ubntsvr:~$ df -h
Filesystem Size Used Avail Use% Mounted on
udev 184M 0 184M 0% /dev
tmpfs 41M 3.9M 38M 10% /run
/dev/mmcblk0p2 6.9G 1.9G 4.7G 29% /
tmpfs 205M 0 205M 0% /dev/shm
tmpfs 5.0M 0 5.0M 0% /run/lock
tmpfs 205M 0 205M 0% /sys/fs/cgroup
/dev/loop0 49M 49M 0 100% /snap/core18/1708
/dev/loop1 62M 62M 0 100% /snap/lxd/14808
/dev/loop2 24M 24M 0 100% /snap/snapd/7267
/dev/mmcblk0p1 253M 98M 155M 39% /boot/firmware
tmpfs 41M 0 41M 0% /run/user/1000
ubuntu@rpi-ubntsvr:~$ sudo fallocate -l 1g /swapfile
ubuntu@rpi-ubntsvr:~$ sudo chmod 600 /swapfile
ubuntu@rpi-ubntsvr:~$ sudo mkswap /swapfile
Setting up swapspace version 1, size = 1024 MiB (1073737728 bytes)
no label, UUID=c8b179ac-b822-40ad-8805-244c90ab0f4b
ubuntu@rpi-ubntsvr:~$ echo ‘/swapfile swap swap defaults 0 0’ | sudo tee -a /etc/fstab
/swapfile swap swap defaults 0 0
ubuntu@rpi-ubntsvr:~$ sudo swapon -a
- デスクトップ環境のインストール
ubuntu@rpi-ubntsvr:~$ sudo apt install xubuntu-desktop
パッケージリストを読み込んでいます… 0%パッケージリストを読み込んでいます… 100%パッケージリストを読み込んでいます… 完了
依存関係ツリーを作成しています… 0% 依存関係ツリーを作成しています… 0%依存関係ツリーを作成しています… 50%依存関係ツリーを作成しています… 50%依存関係ツリーを作成しています
状態情報を読み取っています… 0%状態情報を読み取っています… 0%状態情報を読み取っています… 完了
以下の追加パッケージがインストールされます:
accountsservice-ubuntu-schemas acl adwaita-icon-theme alsa-base alsa-utils anacron apg apport-gtk appstream apt-config-icons aptdaemon
aptdaemon-data apturl apturl-common aspell aspell-en at-spi2-core atril atril-common avahi-autoipd blueman bluez bluez-cups bluez-obexd
brltty brltty-x11 bubblewrap catfish cheese-common colord colord-data cpp cpp-9 cracklib-runtime crda cups cups-browsed cups-bsd cups-client
: : : :
: : : :
: : : :
Taking backup of spi2-1cs.dtbo.
Installing new spi2-1cs.dtbo.
Taking backup of w5500.dtbo.
Installing new w5500.dtbo.
dictionaries-common (1.28.1) のトリガを処理しています …
aspell-autobuildhash: processing: en [en-common].
aspell-autobuildhash: processing: en [en-variant_0].
aspell-autobuildhash: processing: en [en-variant_1].
aspell-autobuildhash: processing: en [en-variant_2].
aspell-autobuildhash: processing: en [en-w_accents-only].
aspell-autobuildhash: processing: en [en-wo_accents-only].
aspell-autobuildhash: processing: en [en_AU-variant_0].
aspell-autobuildhash: processing: en [en_AU-variant_1].
aspell-autobuildhash: processing: en [en_AU-w_accents-only].
aspell-autobuildhash: processing: en [en_AU-wo_accents-only].
aspell-autobuildhash: processing: en [en_CA-variant_0].
aspell-autobuildhash: processing: en [en_CA-variant_1].
aspell-autobuildhash: processing: en [en_CA-w_accents-only].
aspell-autobuildhash: processing: en [en_CA-wo_accents-only].
aspell-autobuildhash: processing: en [en_GB-ise-w_accents-only].
aspell-autobuildhash: processing: en [en_GB-ise-wo_accents-only].
aspell-autobuildhash: processing: en [en_GB-ize-w_accents-only].
aspell-autobuildhash: processing: en [en_GB-ize-wo_accents-only].
aspell-autobuildhash: processing: en [en_GB-variant_0].
aspell-autobuildhash: processing: en [en_GB-variant_1].
aspell-autobuildhash: processing: en [en_US-w_accents-only].
aspell-autobuildhash: processing: en [en_US-wo_accents-only].
libgdk-pixbuf2.0-0:arm64 (2.40.0+dfsg-3) のトリガを処理しています …
rygel (0.38.3-1ubuntu1) のトリガを処理しています …
libc-bin (2.31-0ubuntu9) のトリガを処理しています …
systemd (245.4-4ubuntu3) のトリガを処理しています …
dbus (1.12.16-2ubuntu2) のトリガを処理しています …
sgml-base (1.29.1) のトリガを処理しています …
- 処理の途中で、ディスプレイマネージャーを選びました(ディスプレイマネージャーはlightdm)
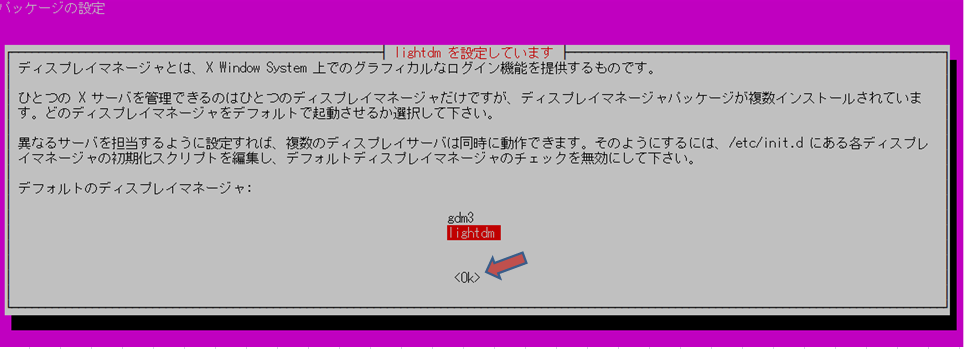 ディスプレイマネージャーは「lightdm」を選びました。tabでOKに移動して、クリック |
- ネットワークのバックエンドを「systemd-networkd」から「Network Manager」に切り替えました
/etc/netplan/50-cloud-init.yaml はそのままにします。
root@rpi-ubntsvr:/home/ubuntu# vi /etc/netplan/50-cloud-init.yaml
# This file is generated from information provided by the datasource. Changes
# to it will not persist across an instance reboot. To disable cloud-init’s
# network configuration capabilities, write a file
# /etc/cloud/cloud.cfg.d/99-disable-network-config.cfg with the following:
# network: {config: disabled}
network:
ethernets:
ens0:
dhcp4: true
version: 2
/etc/netplan/50-cloud-init.yaml を以下の内容だけにします。
root@rpi-ubntsvr:/home/ubuntu# vi /etc/netplan/vi 99_config.yaml
version: 2
renderer: networkd
ethernets:
eth0:
dhcp4: false
dhcp6: false
addresses: [192.168.0.177/24] →LAN内のIPアドレス
gateway4: 192.168.0.1 →デフォルトゲートウェイ
nameservers:
addresses: [aaa.bbb.ccc.ddd,eee.fff.ggg.hhh] →DNSサーバ
wifis:
wlan0:
addresses: []
dhcp4: true
optional: true
access-points:
ACCESSPOINT-SSID1:
password: “password”
ACCESSPOINT-SSID2:
password: “password”
root@rpi-ubntsvr:/home/ubuntu# sudo netplan try
上記、コマンドのチェックでOKであれば、立ち上げ直しのシーケンスであったが、
ストールして、再起動されたが、ウィンドウは立ち上がった。
- X11 VNCserver インストール
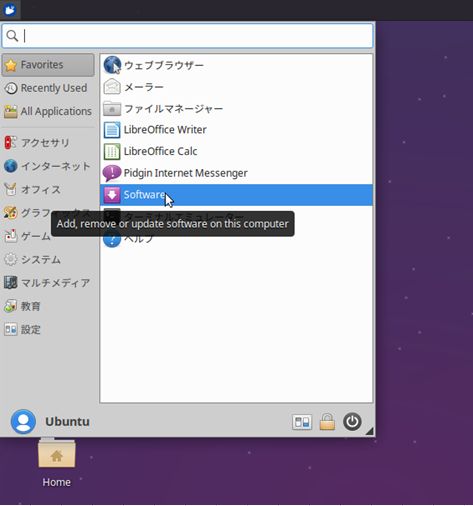 左端メニューから、「Software」を起動する |
 「Communication & News」をクリック |
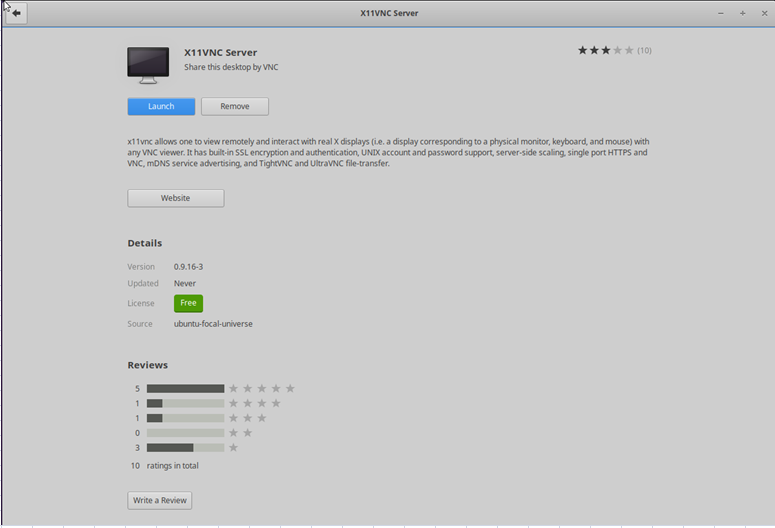 こちらはインストール後、画面イメージ 「X11VNC Server 」をインストール |
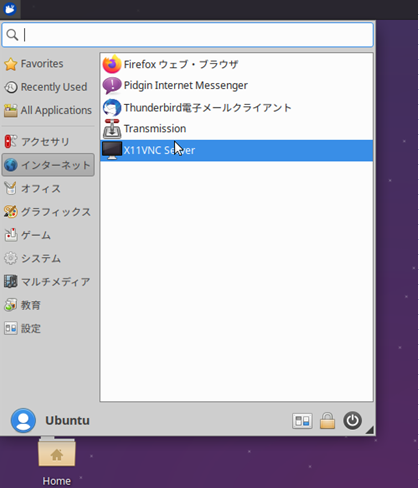 設定メニューから、「X11VNC Server」をクリック |
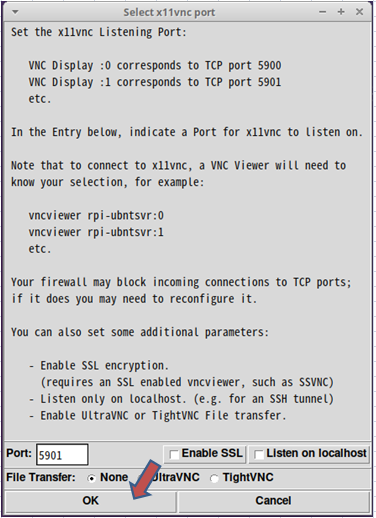 デフォルトでOK |
 パスワードを設定してOKをクリック |
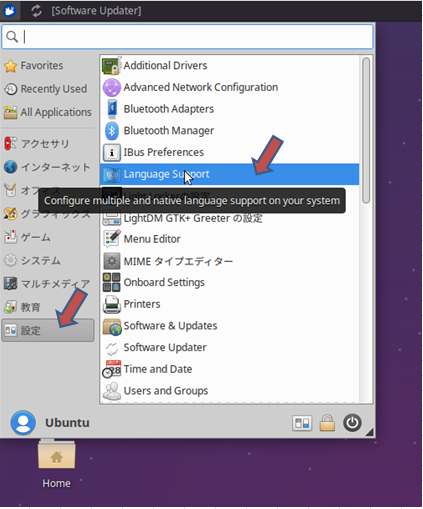 「設定」→「Llanguage Support」をクリック |
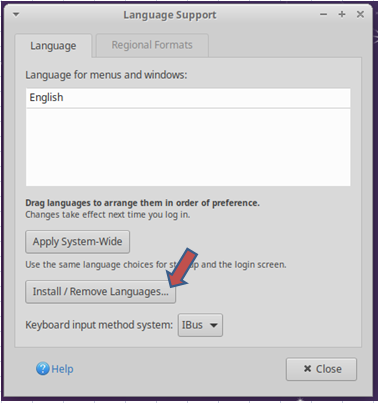 「Install / Remove Languages…」をクリック |
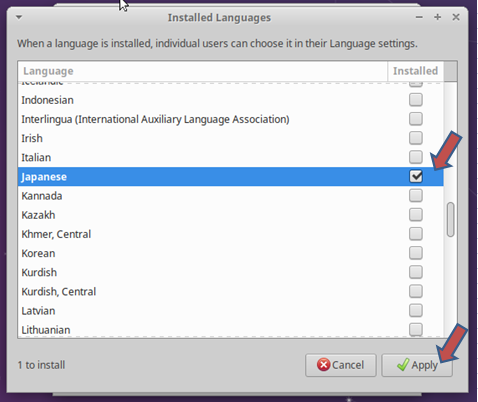 「Japanese」→「Apply」をクリック |
 Ubuntuユーザのパスワード を入力し、「Authenticate」をクリック |
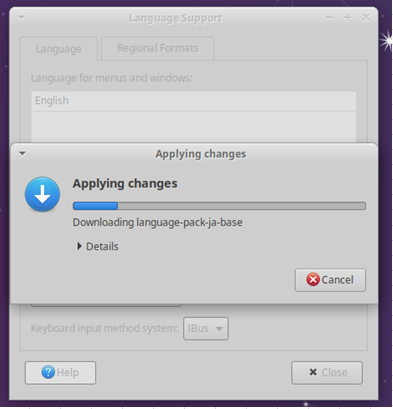 すると必要なパッケージがインストールされます |
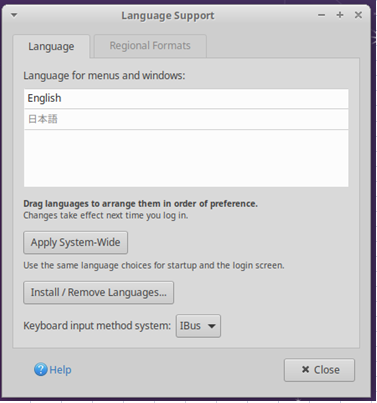 「Language for menus and windows」に「日本語」追加されたので,ドラッグ&ドロップで上に持ってきます |
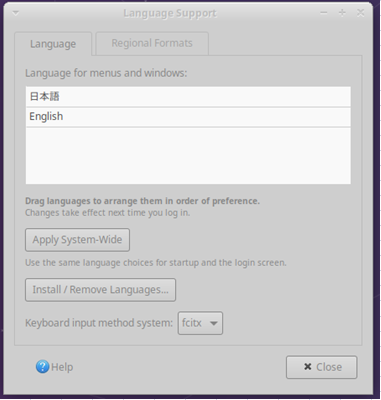 ログアウト→ログインで日本語が利用できます |
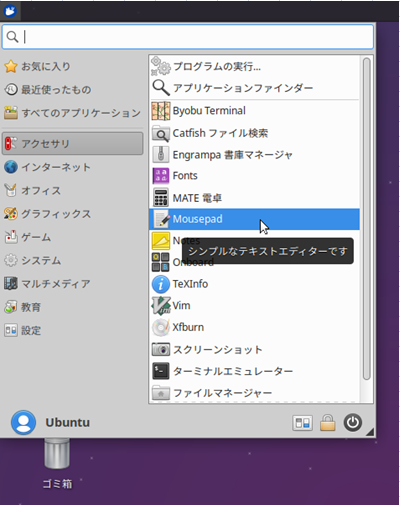 「アクセサリ」→「Mousepad」でエディタを起動します |
 Mousepad が起動しました |
 |
|
表示が日本語入力モードになり |
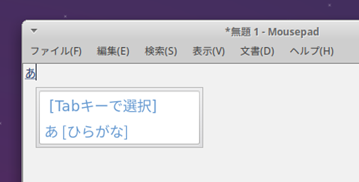 |